Category Archives: Wood Working

Apprentice Marks Makes: Fancy Record Crates

Like many hipsters, I’m not just a computer programmer who practices woodworking on the weekends, maintains an excellent beard, and spends far too much money on craft beer. I also collect records, and my original record storage solution has recently overflowed into a pile of records that are sitting on top of my record player. It’s time for something new.

The design, pre-finish, and without the end cap panels installed

The design, pre-finish, and without the end cap panels installed

To accommodate my collection, I decided to build three boxes. Two with inner dimensions of 13″ cubed, and one with inner dimensions of 13″ x 13″ x 18.5″. The larger crate is about 1.5x wider than the smaller crates, and was intended to stack on top of the two smaller ones, which would sit side by side.

To make the crates visually interesting, I decided to make the ends like picture frames, with a different colour panel inserted into them to break up the negative space.

Cutting the frame edges to length

Cutting the frame edges to length. I chose 13″ as my inside dimension, because it would allow the boxes to accommodate even my largest box set records.

The frames were made from some rough poplar that I got from a tree that my dad cut down some time ago. The poplar was rough sawn when I got it, so I jointed it, planed it, and cut it down into 13″ x 1.5″ x 1.5″ strips that would form the frame edges.

00201-00_01_23_28-still004

The jig is made of some 1/2″ plywood and is glued and tacked together. In retrospect, it should probably be longer, to prevent it from tipping forward or backward as it is pushed.

With the edges cut to size, I used a simple jig that rides on top of my table saw fence to cut the mortises on one end of each strip. This jig allowed me to clamp the piece vertically, so that I could push it through the saw without fear of it rotating, and without getting my hand anywhere near the blade. It’s basically a super-cheap homemade version of a tenoning jig.

00201-00_01_29_21-still005

I have two crosscut sleds: One for my 1/8″ blade, and another for my 3/8″ dado stack

I cut a tenon on the other end of each edge using a simple crosscut sled with a stop block and a dado blade. To make sure that the joints fit together tightly, I started the dado blade lower than necessary and snuck up on the perfect width for the tenon. Just to cover my ass, I cut one extra edge for testing so that I didn’t have to fear ruining one of my production pieces.

00201-00_02_07_21-still010

There are only five frames in this photo. I have no idea where the sixth one went.

With all of the joinery complete, I assembled the frames with some carpenter’s glue. One nice aspect of assembling a frame with mortise and tenon joints instead of mitred corners is that it’s dead simple to get the frames square. As long as the joinery is square, once the frames are clamped together, there is very little adjustment needed to ensure that each of the interior angles is 90 degrees.

00201-00_02_10_14-still011

Once the glue dried, I used a chamfer bit at the router table to soften the outside edges of the frames. I could have used a round-over bit here, but I wanted to leave the hard lines on the work, because they are meant to look sort of industrial and heavy, and I thought that soft edges would ruin that look.

00201-00_02_22_06-still012

Next, I used a rabbeting bit to cut a 1/4″ square rabbet along the inside rear of each frame. This is where the insert will sit, similar to the glass in an actual picture frame. If I were doing this again, I think I would have cut this rabbet at the table saw. The router made a real mess out of some of these cuts, chipping and tearing the wood away from the finished edge.

I asked a woodworker friend about it, and he told me that the cause might actually be the variety of the wood that I was using. He said that there are some varieties of ash that are often mistaken for poplar, and that they have a tendency to chip and tear. I guess that’s a risk that you take when using free lumber.

An assembled panel

An assembled panel

With my frames complete, it was time to build the panels that were to sit inside of them. I picked up some cheap knotty pine wainscotting from my local Home Depot, cut the pieces to a 10.5″ length, glued them into panels, and then cut the panels to their final size. I used a dado blade to cut a 1/4″ rabbet around the outside edge of each panel, which will correspond to the rabbet that I cut into the frames, giving me two flat surfaces to glue together.

2016-12-20-11-20-00

Now that I had all of the pieces assembled for the ends of my crates, I needed some way to tie them together. I bought some 1″ x 8″ x 6′ clear poplar boards and cut them down into strips 1.5″ wide and 1/4″ thick. The two smaller boxes required 42 strips cut 14.5″ long, while the bigger box required 21 strips cut 19.5″ long.

2016-12-20-13-44-53

I used a 3/8″ wide piece of scrap to ensure that the spacing between strips was correct

I used carpenter’s glue and 3/4″ brad nails to tack seven strips to three sides of each set of frames. This was easy enough, albeit time consuming, once I figured out how to jig my frames up to keep them square to one another during assembly.

2016-12-22-12-21-07

After a thorough sanding, I stained each of the boxes a deep red, and then glued the wainscoting panels into the frames. A coat of spray-on fast drying polyurethane will protect the boxes from incidental bumps and scratches.

2016-12-24-12-12-47

After letting the finish cure for a day, I brought the boxes inside and re-organized my collection. They look great, and leave me plenty of space to fill up with even more records.

2016-12-24-11-33-25

Stay tuned for the inevitable follow-up project, wherein a I build even more storage space for the records I will definitely buy over the next year or so.

Leave a Comment

Filed under Wood Working

Apprentice Marks Makes: Pallet Wood End Tables

This project started with a couple of hefty solid wood pallets that I got when my local Home Depot delivered some renovation materials to my home. They were each around 40″ square, and were made of what seemed to be a range of hard wood varieties.

2016-09-15-14-51-41

I started at the pallets with a hammer and a crow bar, but soon resorted to cutting the deck boards off with a circular saw, as my prying was doing a lot of damage to the dry wood. Two pallets yields quite a few usable boards:

2016-09-15-16-06-55

After a few hours of jointing, planing, and table sawing, I had processed most of the deck boards into thin strips, about 3/4″ square, that would be glued together to form laminate tops for my end tables. I made sure to hold a few boards back for building the frames of the tables.

2016-09-17-16-47-08

The goal was to make two end tables, each with a table surface of about 24″ x 24″. since I intended to put a 1″ mitred border around the outside of each table top, I needed to make two 22″ x 22″ laminate pieces out of the strips that I had cut from the deck boards. I wanted to use my bench planer to clean up the laminate pieces, so I started by gluing the strips into four 22″ x 11″ boards.

2016-09-17-17-32-44

After letting the glue cure overnight, I ran each of them through my planer to ensure a smooth surface and a uniform thickness. Next, I ran one edge of each piece across the jointer, and then glued jointed edges together to form two larger boards, each approximately 22″ x 22″.

2016-09-18-12-58-00

Level added for rigidity. It turns out it’s hard to keep a seam in the middle of a 22″ piece properly aligned. I guess that’s what biscuits are for.

After letting the glue cure again, I cut each table top to its final dimensions. Because the boards that I recovered from the pallets had nail holes and other imperfections in them, my table tops inherited some “character”. To ensure a smooth surface, I filled the nail holes with epoxy and sanded them flush.

Next, I cut some strips of hard maple out of some scrap that I had up on my stock shelf. These strips got mitred corners, and were affixed to the edges of each table top using glue and brad nails.

2016-10-01-13-53-17

With the table tops finished, I moved on to the table frames. The original intent of this project was to use reclaimed pallet wood for every aspect of the tables, but getting the nails out of the pallet stretchers (the big heavy pieces that separate the deck boards) proved to be a real challenge, and I didn’t want to risk missing one and ruining a tool with it.

The scrap maple that I used to edge the table tops had originally been cut from some much longer pieces that I got as a part of a used tool purchase back when I first started building out my workshop. I have been saving it for a worthy project, and figured that my first piece of real furniture was reason enough to rip some of it down into 2″ x 2″ table legs.

2016-10-10-12-04-34

I wanted to affix the table aprons (or stretchers – whatever you call the boards that run between the legs) to the legs with a mortise and tenon joint. I cut my mortises at the router, which left a rounded end to the cuts. I went back in with a 1/4″ chisel and squared them off. In the process, I learned that there’s a bit of technique to precision chisel work, and that I need a lot more practice at it.

2016-10-10-13-15-05

With my legs in good shape, it was time to turn my attention to the aprons. The apron boards were cut from some of the pallet deckboards that I had set aside when cutting up the laminate strips. At the tablesaw, I ripped them to 3″ in height, and used my box joint blade (sort of a simple dado stack) to cut a simple tenon on each end.

2016-10-10-13-47-31-1

With the fit looking good, I added an 1/8″ dado along the top inside edge of each apron. This slot will accept some table top fasteners that I bought off of Amazon. The intent of this hardware is give the wood grain that forms the table tops room expand and contract without cracking.

2016-10-15-11-15-44

The glue-up for the table frames was a bit stressful. I worked as quickly as possible, and tried to remember to wipe away all of the excess glue. My first timer joinery was mostly hidden in the process, which is probably for the best.

2016-10-15-14-07-25-hdr

Once I had the frames assembled and squared up, I clamped them to the bench and added some corner blocks to prevent them from twisting.

2016-10-15-16-22-16

After another overnight wait for the glue to cure, it was time to affix the table frames to the tops. Before doing so, I sanded everything down through 120 grit, 200 grit, and 000 steel wool to prepare for the finish.

2016-10-16-11-15-01

One of the things that I love about this project is the contrast of all the different varieties of wood that make up the laminate table tops. I didn’t want to lose this contrast when applying a finish, so I didn’t stain the wood at all. Instead, I just layered up some wipe-on polyurethane.

2016-10-21-15-23-28

Each table got two coats, and the table tops got a third coat for good measure. I sanded with 000 steel wool between each coat to remove any imperfections.

The finished tables look great in our living room. I’m really proud of the way that they turned out, especially considering that they’re my very first large furniture project. Now I just need to find time to build a coffee table to match.

2016-10-22-20-52-38

2016-10-22-20-52-55

2 Comments

Filed under Wood Working

Faux-Vintage Picture Frames

For the past three years, my wife and I have been attending Fan Expo in Toronto. In the past, I’ve described it to friends as Canadian ComiCon, which is a bit confusing, because there actually is a Toronto ComiCon, but it’s smaller and less well-attended than Fan Expo.

One of the features of Fan Expo is the Artist Alley, where local artists and more well known comic book artists sell prints of their work. Over the past two years, my wife and I have purchased eight large prints at the event, but until now, they’ve been sitting in a pile in our office, because we haven’t had any picture frames large enough to hold them.

2016-09-05-11-50-17

I started out with some clear pine boards, all cut to approximately 22″ in length, jointed, and planed to around 5/8″ thick.

2016-09-05-12-05-36

Next, I ripped the boards into 1.5″ strips, and cut them to length. Four of the prints were 11″ x 17″, while the other four were 12″ x 18″. Since the bezel on each of my frames is 1.5″ wide, I added 3″ to all of those dimensions to determine the final length of the strips.

2016-09-05-12-35-12

With the strips cut to length, I mitred their ends. I also used my box joint blade and a sacrificial fence to cut a dado that would hold the glass along the short edge of each strip. Unfortunately, I neglected to take a picture of that step. Ah well.

2016-09-05-13-27-43

With the cutting done, it was time to glue all of the frames into their final shapes. Since I don’t have enough clamps to secure eight frames all at once, this step took awhile to complete.

2016-09-05-15-08-07

Mitred frames look cool, but glued end grain butt joints aren’t particularly strong, so I wanted to strengthen the corners of each piece. I used a simple jig to run each frame across the blade of my table saw, with its wide sides perpendicular to the table, and its long edges angled 45″ off of the table surface.

2016-09-05-15-08-23

The result of this operation was an 1/8″ wide slot cut into each corner, running directly through the plane perpendicular to the mitre joint.

2016-09-05-16-58-10

I glued a thin slice of pine into each of these slots, ensuring that the grain in the slice ran perpendicular to the mitre joint, strengthening it significantly.

2016-09-13-14-17-48

With the glue dried, I cut away the excess material, added a chamfer around the edge of each frame, and gave them all a good sanding down to 220 grit.

2016-09-15-10-04-21-hdr

After hitting each frame with a coat of Minwax pre-stain wood conditioner, I applied a coat of this Classic Black stain and polyurethane combination with a foam brush.

2016-09-15-12-00-32


One coat in, this finish looked awful. The stain component of the product soaked into the wood unevenly, leaving a splotchy finish, and the polyurethane part of the product made it thicker than most of the stains that I’ve worked with, which really only made it harder to work with, and left an overly glossy finish behind.

2016-09-25-14-29-23

In an effort to even out the finish, I sanded with 000 steel wool, and applied a second coat of the stain product. When that dried, I used steel wool to take the gloss off of the frames and wear down the edges, giving the them a sort of faux-worn look. Finally, I hit them with a satin spray polyurethane to seal the exposed wood.

2016-10-11-20-32-51

While this was undoubtedly the long way to accomplish the finish that I ended up with, I’m pretty happy with how they turned out. My mitres are tight, my corners are square, and the worn edges look pretty cool with some of the art that we bought.

2016-10-11-20-33-27

To finish the job, I ordered some 1/16″ thick glass panes from a local supplier that does custom cuts. The prints are sandwiched between the glass and a sheet of 3/16″ foam core, which is pinned in place with a few small brad nails.

This job has been taking up space in my shop for a couple months now, so it’s good to finally get it finished, and to get the prints that we bought two years ago up on the wall. They look great, and I’m really happy with the results.

Leave a Comment

Filed under Wood Working

A (Small) Bookshelf for the Kitchen

My wife has a lot of books. We have a whole room in our house dedicated to storing them. We call it the library, because we’re snooty like that. Some of the other rooms of our house have dedicated shelves for specific kinds of books. In the kitchen, we keep cookbooks in a cupboard above our microwave, but that cupboard is now so full that we can’t add any more books to it.

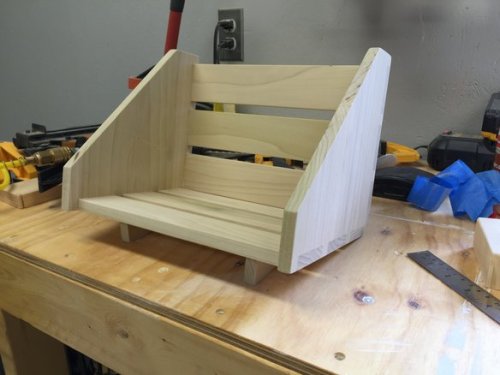
To rectify the situation, my wife asked me to build her a counter top sized bookshelf that could accommodate her favourite cookbooks, so that they were out and easy to access, and more cupboard space was made available for the inevitable purchase of additional books. The plan was pretty simple. I’d build two triangle-ish end pieces, with slats joining them together. The whole construction would be angled backward at about 15 degrees, tilting the spines of the books up towards anybody who might be looking at the shelf.

2016-06-13 13.32.37

I started with a 1″ x 6″ x 6′ piece of poplar from the Home Depot, which was actually 3/4″ x 5 1/2″ x 6′ long. Before I did anything else, I jointed and planed this piece to ensure that it was square, and milled it to a final thickness of 1/2″.

Since I wanted the end pieces of the shelf to be approximately 8″ x 8″ along their non-hypotenuse sides, the first job was to cut four 5 1/2″ x 9″ pieces from the poplar, and joint them together to form two 11″ x 9″ boards. These would later be cut down to the appropriate sizes to form the ends of the shelf.

2016-06-13 12.52.34

With the glue dried, I cut the end pieces to size, and then mocked up a simple jig on my crosscut sled that allowed me to cut the angle bit that turned the end pieces from rectangles into sort-of-triangles.

2016-07-17 13.04.39

Once the final size of the shelf ends was established, I could work on the joinery for the slats that would hold them together. I settled on 2″ by 1/2″ slats, each around 13″ long, which would give me a final interior shelf length of approximately 12″. I used my box joint blade to cut three slots along each of the straight edges for the slats to fit into.

2016-07-17 14.47.48

The trick with this approach is to cut each slot just a little bit small, and then to sneak up on the final dimensions, fine tuning where necessary with a file and sand paper to achieve a tight joint. Thankfully, I didn’t screw anything up, and because my slats had been milled to a uniform size, they were all interchangeable.

With the slots cut out of both ends, I started to attach the slats, using glue and 3/4″ brad nails to tack it all together while the glue dried.

2016-07-17 15.06.42

With all of the slats attached, the shelf really started to take shape.

2016-07-17 15.17.38-1

Next, I needed to cut some triangle pieces that would act as feet for the shelf, tipping it backward so that the spines of the cookbooks were angled up toward the viewer. Since I needed them to be the same, I got smart and taped two pieces of scrap poplar together, then marked out the desired shape and ran them both through the table in a single pass.

Once cut, I glued the feet to the bottom of the shelf, and tacked them in place with brad nails from the other side. This required some temporary tape to hold the feet in place while I flipped the piece over and fired the brad nails. I swear, I’m constantly finding more uses for that blue painters’ tape. It’s great stuff to have around.

2016-07-28 14.06.23

With the legs attached, the shelf really looked great. I gave the whole thing a good final sanding down to 220 grit in preparation for finish.

2016-07-28 14.13.46

The finish consists of a single coat of brown stain that I had left over from a previous project, followed by a coat of wipe on polyurethane. Both coats were applied by hand with an old rag, and between coats, I sanded with 400 grit sand paper, as well as 000 steel wool.

2016-07-30 14.45.38

After letting the finish cure on the bench for a couple of days, I brought the shelf inside, and Steph loaded it up with her favourite cookbooks. I’d say that it turned out pretty well.

2016-07-31 13.17.14

Leave a Comment

Filed under Wood Working

Cupboards for my Workshop

Since my shop is only about 17’x11′, it can get a bit cozy at the best of times. As I’ve continued to work in it, I’ve realized that having a decent storage system and constantly cleaning up as I work are key to maintaining a safe and productive environment. So instead of tidying up my space, I decided to build some cupboards to enhance my storage game. After all, what’s the point of tidying if I don’t have anywhere to put all of my shit?

I started off with a 4×4 sheet of 1/2″ GIS plywood that was left over from building my workbench.

2016-05-08 11.07.12

Using the table saw, I sliced the plywood into four one foot wide by four foot long strips. These would become the long sides of my cupboard boxes, which in turn meant that my cupboards would have a depth of about one foot.

2016-05-08 11.18.41

On each strip, I marked out three dados – one on each end, to accept the end caps of the cupboards, and another in the middle, where a divider would split the box into two compartments, each two feet wide.

2016-05-08 11.24.55
I cut the dados on my tablesaw, using a box joint set that makes perfect 1/2″ dados with flat bottoms. For the dados on the ends of the long strips, I set up a sacrificial fence so that the blade didn’t come into contact with my actual fence, which is made of metal, and eats sawblades for snacktime.

2016-05-08 11.52.28

These are the finished sides of the cupboards. That line down the middle does not go all the way through the pieces.

2016-05-08 12.06.46

Next, I cut the end caps for my cupboards. I needed six – one for each end of the two long boxes, and two more to split those boxes into two compartments. I made my end caps 12″ deep to match the width of the long pieces, and about 16″ tall, as that’s the height of the space where I want to hang my cupboards. This means that the final product will be two large cupboards, split into four 24″x16″ compartments.

2016-05-08 12.20.06

With the end caps cut, I could assemble the large boxes. I glued the end caps into the dados that had been cut into the longer pieces, tacked everything together with my brad nailer, and then put it all in clamps to dry.

2016-05-08 12.47.15

At this point, my 11’x17′ shop had two 2’x4′ boxes taking up most of the useable floor space in it. I found myself moving the boxes constantly to keep them out of the way while I continued to work.

2016-05-08 12.56.51

Once the glue was dry, I cut some thin clear pine strips and tacked them around the front edges of each box, giving them a nice veneer that hid the edges of the plywood. While it’s easy to work with, and was cheap scrap left over from a previous project, the pine was actually too soft for this application. I fully expect it to be dented and scratched and chipped after a few years of hard use. In retrospect, something harder would have made more sense for this application, as the fronts of the cupboards will get a lot of abuse.

2016-05-08 14.04.25

Here’s a shot of both boxes with the face trim complete

2016-06-13 13.35.26

With the cupboard boxes functionally complete, it was time to start on cupboard doors. This was actually the real challenge of the project, since making the boxes consisted of scaling up techniques that I’ve already learned.

I started by cutting the outer frame pieces from some more clear pine, again left over from a previous project. I cut everything just a bit long, and was careful to avoid knots that might lead to trouble down the line. Once the pieces were planed and jointed, it was easy to see how they’d fit together.

2016-06-13 14.08.51

I wanted to make rail and stile doors, which consist of an outer frame and a floating inner sheet of plywood, so the first step was to cut a dado on the inside of each of the rails and stiles that would accept the plywood that makes up the majority of the door surface.

The dado is 1/4″ wide, and was cut with a couple of passes across my standard table saw blade. The key to this technique is to flip the piece end over end with every pass, keeping the cut centred while slowly edging the fence out from the blade, sneaking up on a dado width that snugly accepts the plywood centre. Once I found that width, I left the fence in place, and used it to cut all of the other dados to the same width.

2016-06-13 14.51.57

Because my saw blade isn’t 1/4″ wide, this approach left me with a bunch of garbage material down the centre of my dado. Once the width was determined, I could move the fence and take another pass to hog this material out. The finished dado fit snugly onto the plywood that would form the inside of my doors.

2016-06-13 14.45.28

With the dados cut, I fashioned a tongue on the ends of each rail (the 16″ vertical edges of the cupboard doors). The first step was to figure out the length of each rail. I laid the stiles out on my cupboard boxes, set the rails on top, and worked out the final length of each rail, taking into account the fact that I was going to cut a tongue onto the end of the rail to fit into the dado on the stile.

2016-06-13 15.01.23

The next step was to slice off the outer edges of the piece in a series of passes perpendicular to the table saw blade, leaving a tongue the width of the dado exposed. Because the tongue is the same width as the dado, it will butt into the dado on the accepting piece, creating a tight joint.

2016-06-13 15.43.51

With the tongues and grooves cut to size, the doors could be dry fit together to test my cuts.

2016-06-13 16.05.52

Once I was sure that everything was the right size, I glued each cupboard together. It’s important to note here that the plywood in the centre of the frame is floating. It is not glued into the frame, because it’s meant to leave space for the materials to expand and contract with the weather, without cracking the door.

2016-06-13 16.30.02

Once the glue dried on the doors, I gave everything a thorough sanding and test fit my hinges. These are european-style hinges that allow the cupboards to open to 90 degrees, with the doors entirely perpendicular to the boxes. In this shot, the cupboards are upside-down. When hanging on the wall, the door will open upward, toward the ceiling.

2016-07-03 14.42.50

Once I was sure that everything would fit, I removed the hardware and masked the pieces off for painting.

2016-07-03 16.08.58

The cupboard boxes were painted the same grey as the walls of the shop, and the face trim was painted white. I used an alkalyde paint that I had left over from painting the trim on the outside of the garage. It’s meant to harden with a tough shell that resists damage, so my hope is that it will help the cupboards stand up to the abuse that they’re sure to receive in the shop.

2016-07-10 10.44.53

The cupboard doors got the same white paint job as the trim. My 12′ work bench comes in really handy when painting 8′ of cupboard doors.

2016-07-10 10.44.45

After letting the paint cure for a couple of days, I hanged the cupboard boxes on the wall above my work bench, screwing scraps of 2×4 into the studs in the wall, and affixing the cupboards to those scraps with 1 1/2″ wood screws. This probably isn’t the strongest way to hang cupboards, but it seems to be holding up ok, so here’s hoping that it doesn’t all come crashing down on me sometime soon.

2016-07-10 12.40.54

Finally, I re-attached the hinges, and added some cheap friction slides that help the doors to stay open in their eternal struggle with gravity.

2016-07-17 12.01.27-1

Look at all the space that I have on my workbench now that my shit is packed away into cupboards! I still need to do some organizing, especially in the left-most compartment, but it’s a start.

2016-07-17 12.02.06 HDR-2

This project has been a long time in the works. There were a lot of stops and starts and distractions, so it took me four or five weeks to get them done. If I worked straight through, I suspect that I could have finished them in two hard weekends of work with no problem.

All in all, I’m really happy with how they turned out, and my experiment with rail and stile cupboard doors was a success. I’ll have to use that joint again, perhaps for some cheap picture frames, or maybe a box with slats for sides.

2 Comments

Filed under Wood Working

Cake Pops!

Well, actually, cake pop stands. My wife Stephanie is the one that makes the cake pops. I just make the things to display them with. This past weekend, our friends Warren and Kaitlin were married, and they asked Stephanie to make some cake pops for their reception. In turn, Stephanie asked me to come up with a classy way to present the cake pops. This is what I came up with:

2016-06-26 12.57.30

There are around 55 cake pops in a batch, and Stephanie planned to make two batches, so I wanted enough space to display 100 treats at once. I settled on five trays, each large enough to hold 20 cake pops. The final dimensions would be 6″ by 7.5″, with a matrix of evenly spaced holes centred 3/4″ from each edge. These dimensions meant that each hole would be 1.5″ from each other hole, which suits the average diameter of a cake pop perfectly.

2016-06-26 12.58.14

I started off with a 1″ x 10″ x 6′ length of clear poplar stock from Home Depot. Because the lumber industry doesn’t understand that numbers have meanings, the actual dimensions of this piece were 3/4″ x 9.25″, which left plenty of stock to cut my five 6″ by 7.5″ rectangles.

2016-06-26 13.04.47

On each piece, I marked out a grid for the holes

2016-06-26 13.44.51-2

Since I don’t yet own a drill press, I took a trip out to my parents’ place to borrow my Dad’s. It was the perfect tool for the job, and allowed me to drill a hole at each intersection that was perfectly perpendicular to the piece, and the correct depth to boot.

2016-06-26 14.37.05

The diameter of each hole is 5/32″, which is just a bit tight for the sucker sticks that Stephanie intended to use for her cake pops. Later on, I’d end up reaming each of the holes out just a bit to ensure that the sticks could slide in and out of the holes with ease. Unfortunately, the next size up in my drill index is 11/64″, which was a bit too loose for this application.

2016-06-26 14.56.06

To add a bit of detail to the face of each stand, I decided to chamfer each hole with a countersink bit. Back in my shop, I used my router to add a 45 degree chamfer to the edges of each tray. They’re simple touches, but in my eye, they add a bit of detail that really cleans the pieces up.

2016-06-26 15.47.22-1

After a good sanding down to 220 grit, I finished the trays with two coats of butcher block oil, sanding to 400 grit in between coats.

2016-06-26 16.26.19

Following the manufacturer’s directions, I let the finish cure for three days to ensure that it was food safe before letting anybody lick it. As mentioned above, I had to bore each hole after finishing the pieces, because the oil caused the grain around each hole to expand a bit.

The pieces were finished in plenty of time for Saturday’s wedding, and even though I forgot to take a picture during the reception (in my defense, the lighting was poor, and well, I’d had more than a few beers), I did take this picture of one posing with the left over cake pops the next morning:

2016-07-03 08.44.06

All in all, this was a really fun project. It only took me about a half day to complete (not including waiting for the finish coats to dry), and I’m really happy with how the trays turned out. They aren’t as tasty as my wife’s cake pops, but they do complement them pretty damned well.

Leave a Comment

Filed under Wood Working

My 12′ Long Workbench

When it came time to build a work bench for my brand new shop, I decided to go big. If you’re familiar with the much smaller bench that I built for my basement shop, the design of this project will be quite familiar. I’ve tweaked a few things here and there that I think will improve the end product, but at the end of the day, this is a fairly standard 24″ wide bench with a single shelf, built from plywood and 2x4s.

Photo 2016-01-31, 9 43 36 AM

I started by squaring off the ends of four twelve foot long 2x4s. These will serve as the stringers for the bench shelf and top.

Photo 2016-01-31, 9 29 08 AM

I decided to notch the stringers where each of the cross members attach. This helps to keep the structure square, and gives plenty of surface area for gluing and screwing the pieces together. Since the stringers are far too long to notch at the table saw, I used a 1/2″ straight cutting bit on my router. This simple jig clamps to the work piece and ensures that each notch is cut 1 1/2″ wide.

Photo 2016-01-31, 10 04 20 AM

The first time I tried to use this jig, I got a little bit too ambitious. I set the depth of the cut to the full 3/4″, and tried to cut through two of the stringers at once. My poor old second-hand router couldn’t keep up, and the bit wiggled loose, tearing a deep gash into my workpiece. Lesson learned, I continued by cutting one notch at a time, and removed the material with two passes instead of one. It took longer, but the router appreciated my patience.

Photo 2016-01-31, 11 01 28 AM

Here you can see one stringer with all of the notches cut, and the five perpendicular cross members inserted into them. Because the final width of the bench is meant to be 24″, and the notches are cut 3/4″ deep, each cross member is cut 22 1/2″ long.

Photo 2016-01-31, 11 09 44 AM (1)

Because the notches in each stringer are cut in the same place, the bench shelves come together very easily, and are almost perfectly square. I put wood glue and two screws on each butt joint between the stringers and cross members. This approach makes for really strong joints that will probably hold up for longer than I do.

Photo 2016-02-13, 1 51 27 PM

With the cross members done, I cut four 24″ end caps at the table saw. Each end cap has a 1 1/2″ notch cut out of its end that is 3/4″ deep, just like the notches in the stringers.

Unlike the cross members, the end caps fit over the ends of the stringers.

Photo 2016-02-20, 10 56 04 AM

With the skeletons of both shelves complete, it was time to attach some legs. Most garage floors aren’t level, and mine is no exception. I used a string line and a level to figure out the fall, and found that my floor drops 1″ over the 12′ length of the bench. As such, the legs closest to the far wall are 36″ tall, while the legs closest to the camera are 37″ tall. This results in a bench with level shelves that can’t really be moved out of the back corner that I’ve built it for.

Photo 2016-02-21, 12 41 02 PM

Once the legs were on and the two shelves were attached to them, I sheathed each shelf with 1/2″ sanded fir plywood. I had to use a jigsaw to notch the holes out for the legs. The plywood added a lot of weight and rigidity to the bench, and at this point, it really started to feel like a hefty piece of shop furniture.

Photo 2016-02-21, 3 13 39 PM

Once the bench was complete, I gave it a quick once over with my palm sander, and brushed on a coat of Minwax Indoor/Outdoor Helmsman Spar Urethane. Even though I fully intend for this bench to get beat to hell, I wanted a finish that would help to protect it from spills and tool scratches. The brush on product is much thicker than the wipe-on polyurethane that I’ve used in the past, and the satin finish that I chose looks great on the raw wood.

1 Comment

Filed under Wood Working

Building Milk Crate Sized Boxes for my Record Collection

I’m a hipster. Seriously. I have a beard, I’m a foodie, and I collect vinyl records. After moving into my new house, I realized that I needed a new place to store the aforementioned record collection, as the bookshelf that it previously lived on is now on a different floor than the record player, and I’m too lazy to walk up and down stairs every time I want to listen to a record.

This project, as many woodworking projects do, started out with some wood:

Rough cut box sides

One of my goals for this project was to learn how to create a box joint, which is a method of joining two orthogonal pieces of material together by way of cutting a bunch of fingers into each piece and interlacing them, providing a large surface area for glue to adhere to. The result is an extremely strong and handsome joint, but the method requires the sides of the box to be cut longer than you intend them to be.

In general, if all of your material is the same thickness, then each piece needs to be cut two thicknesses longer than you intend its inside dimension to be once joined. My boxes have an outside dimension of 17″ by 14″, but their inside dimensions are only 15.5″ by 12.5″, because my material is 3/4″ thick. If I were joining the sides with a simple butt joint, and the front and back pieces of my box sat between the two side pieces, then the front and back pieces would have to be two thicknesses shorter than the final width of the box. With a box joint, all sides are cut to the intended final outside dimensions of the box, because the interlacing fingers will eat up the extra length. Therefore, the front and back of my box are cut 14″ long, while the sides are cut 17″ long.

Box joints can be cut by hand, or by hogging material out with many passes across a standard table saw blade, but these methods make it hard to keep the fingers and the spaces between the fingers the same width across the entire length of the joint. Instead, I purchased the Freud SBOX8, a table saw blade specifically made for cutting 1/4″ or 3/8″ box joints. It’s basically a dado blade with only two widths that cuts a flat-bottomed channel.

boxjointblade

In addition, I built a simple jig to help keep the spacing between fingers even:

Box joint jig

This jig is basically just a mitre sled with a 3/8″ square piece of hardwood affixed 3/8″ away from the edge of the blade channel. When cutting the fingers of the box joint, you advance the piece along the jig by fitting the previously cut finger over top of the guide piece, which ensures that the next finger will be exactly 3/8″ away from the previous one. This in turn results in fingers and spaces between fingers that are all 3/8″ wide.

Using the box joint jig

In the photo above, you can see that I use my jig to cut two sides of the box at once. Any two sides that join at a 90 degree angle can be cut this way, but they need to be offset by one finger width (in my case, 3/8″) so that the tops of the two pieces will be flush when the fingers are meshed together.

After making a great deal of sawdust, I ended up with all four sides meshing nicely:

All four sides of the box cut, but not yet glued

The next step was to glue the sides together. The wood glue that I typically use has a working time of around 15 minutes. For a project with this many glue surfaces, I’d recommend finding a glue that takes longer to set up, since it takes awhile to get all of the surfaces covered in glue, and you do want to glue the entire box together in one operation so that you can ensure that all of the pieces are square to one another. Many clamps are essential for this process.

The box is glued and clamped

With the glue dry, I used a palm sander and a router with a flush trim bit to clean up the edges of the box as well as any areas where the fingers sat proud of the side of the box. I also used a jig saw to cut some handles into the front and back sides.

The box is glued together and has handles cut in it

The last step was to put a bottom on the box. I used a router with a rabbeting bit to cut a 1/4″ channel around the inside edge of the bottom of the box, then glued in a piece of 1/4″ thick plywood.

Gluing the bottom into the boxes

Finally, it was time for finishing. This project got one coat of Minwax Pre-Stain Wood Conditioner, two coats of Minwax American Chestnut Gloss stain, and three coats of Minwax Wipe-on Polyurethane. Before staining, I sanded down to 220 grit, then hit the surface with triple-zero steel wool between each finishing coat.

In the end, while the finish is smooth and glossy, I think it came out too dark. I really liked the look of the box after the first coat of stain, and if I were doing the project again, I would probably would stopped there.

First coat of stain

I really liked the look of the finger joins with just one coat of stain


Finished box

The finished look is nice, but a bit orange for my tastes. I think the polyurethane has a lot to do with that yellowing effect.

After a lot of hard work, many mistakes, and more than a few false starts, I triumphantly carried my new record crates upstairs and started to put my records into them… only to find out that they wouldn’t all fit. Fuck.

You know that old adage about measuring twice and cutting once? I measured twice, but I only measured a single-platter record sleeve, not realizing that gatefold sleeves and record sleeves that contain two platters are wider than their single-disk counterparts. Luckily, my wife had the bright idea of putting the records into the boxes sideways. It looks a little funny, but it works:

Photo 2015-09-07, 12 29 11 PM

The only problem is that my collection doesn’t have much space to grow. I guess I’ll have to make more boxes after all. Oh well. Back to the shop with me.

1 Comment

Filed under Wood Working

Building a Rubbermaid Friendly Shelving Unit for the Basement

I built a hefty 8’x2′ shelving unit for my basement for about $100. This is the corner that the shelf was built to fit into, with a 2×4 for scale. I would have used a banana, but we’re fresh out.

11709674_496336630532624_1299461048824283228_n

This simple mitre sled jig made cutting the pieces easy.

The block on the table saw fence sets the length of the piece that I’m cutting, but stays out of the way while cutting to avoid kickback.

The block on the mitre sled acts as a feather board, keeping the stock pressed firmly down while cutting. This really helps with longer pieces.

11709434_496336643865956_2329985225513092801_n

Each shelf consists of 1/2″ plywood over a simple 2×4 frame. The front and back are 96″ long, the end caps are 24″ long, and the middle supports are 21″ long.

In this shot, you can see that my basement floor is about 3″ out of level over the 8′ length of the piece. I propped it up with shims, then screwed on some temporary legs once it was level. This gave me a level surface to base the rest of the build on.

11267176_496336663865954_6006421688640402710_n

Next, I attached the five main legs. Each leg is a different height to account for the slope of the floor. The end result is that all of the legs are the same height relative to the shelves

11659251_496336673865953_8530863189273104490_n

With the legs attached, I built the second shelf in the same way as the first, and prepared to attach it to the frame.

To help with positioning, I clamped scrap blocks at the appropriate height on each leg. This gave me something to set the shelf on before I screwed it in place.

Note that from this point forward, all height measurements were taken from the bottom shelf, rather than from the floor.

11705082_496336693865951_2527361371103518532_n

With the guide blocks in place, the second shelf was easy to install.

11222897_496336707199283_3353474680094091168_n

The third shelf was installed in much the same way as the second.

11041190_496336720532615_7432088830031673252_n

I built the fourth shelf in place, because I was working alone and didn’t feel like throwing out my back while lifting it into the air. I used temporary blocks to position the middle supports at the correct height.

11698618_496336730532614_6923150600452359741_n

The top two shelves are half the height of the bottom two, since big stuff tends to be heavy, so it makes sense to keep it near the bottom.

The bottom shelves can accommodate a large Rubbermaid or two small Rubbermaids stacked on top of one another. The top shelves can accommodate a small Rubbermaid.

I had bought some hardware to lag the unit to the wall, but it’s heavy enough that I have to put my full body weight into moving it, so I don’t think it’s going anywhere.

10431451_496336860532601_4140259535093269520_n

Leave a Comment

Filed under Wood Working

Building a 2×4 Workbench for my Shop

This summer, we moved out of our apartment and into our first house. Although the house is in good shape, there is some work that needs to be done, so one of the first jobs was to set up a workshop space. It’s nice to have somewhere to store my tools instead of being confined to the corner of a closet.

10435031_485493734950247_3662483178548101654_n

If you’ve never built anything before, don’t worry. This bench is easy to make, and only costs about $50 in materials. It’s made of 2x4s, and you just need four of each length, plus a half sheet of good one side plywood, cut into two pieces about 2′ by 4′.

Start by cutting the frame pieces out of the 2x4s. My legs are 36″, my front and back stringers are 46″, and my side stringers are 23″.

Pieces of the 2x4 frame

I assembled the front and back first. Each consists of two legs (the vertical pieces) and two long stringers (the horizontal pieces).

Front and back frames

I attached all of the pieces of the bench with 2 1/2″ screws. Because I was screwing so close to the edges of the wood, I was sure to pre-drill the holes. It’s important to make sure that the edges of each corner that you drill are flush.

Make sure that the pieces are flush before drilling

I marked out where I was going to drive in my screws. An inch from each edge is good.

Marking out where to drill

To start with, only drive one screw per corner. This will allow you to push everything into square before driving the rest of the screws and locking the joints into place.

One screw per corner to start with

If the piece is square, then the distance from each top corner to the opposite bottom corner will be the same. If it’s out, just push the stringers in opposite directions until everything lines up.

Once the piece is square, drive the other three screws into each corner. This will lock all of the angles in place.

Making sure everything is square

Once the front and back are built, it’s time to attach the side stringers. I stood the front on end and clamped the side stringer to it so that I had both hands free to drive the screw in.

Clamps help to attach things while you affix them

Same as before, only drive one screw per corner to start. Because the screws for the front stringers were one inch in from each side, I put the screws for the side stringers 3/4″ in from each side.

11139403_485493964950224_8867710410555594852_n

Once the side stringers are attached to the front and back of the bench, it’s time to bring the two pieces together. Now it’s starting to look like a bench. An upside down bench, but a bench nevertheless.

Bringing all four sides together

Again, square everything up, and then drive the rest of the screws in to lock the angles.

Checking for square... again

After flipping the bench over, I put the top on. I used a 2’x4′ sheet of 1/2″ GIS plywood for the top of my bench. The size of the frame gives me an inch of overhang at the front and on both sides.

Putting the top on

The top is affixed to the bench with 1 1/4″ screws. I chose to countersink the screws around the bench top so that they’re flush with the work surface.

Attaching the top

My bench has a shelf below the top. It’s made of the same 3/4″ good one side plywood as the top, but I had to notch out space for the legs.

the bottom shelf

All set up and loaded with tools! I attached a peg board to the wall behind the bench for some extra storage space.

All finished

1 Comment

Filed under Wood Working